LVM useful commands

At work I manage a good deal of virtual machines either through Xen or KVM.
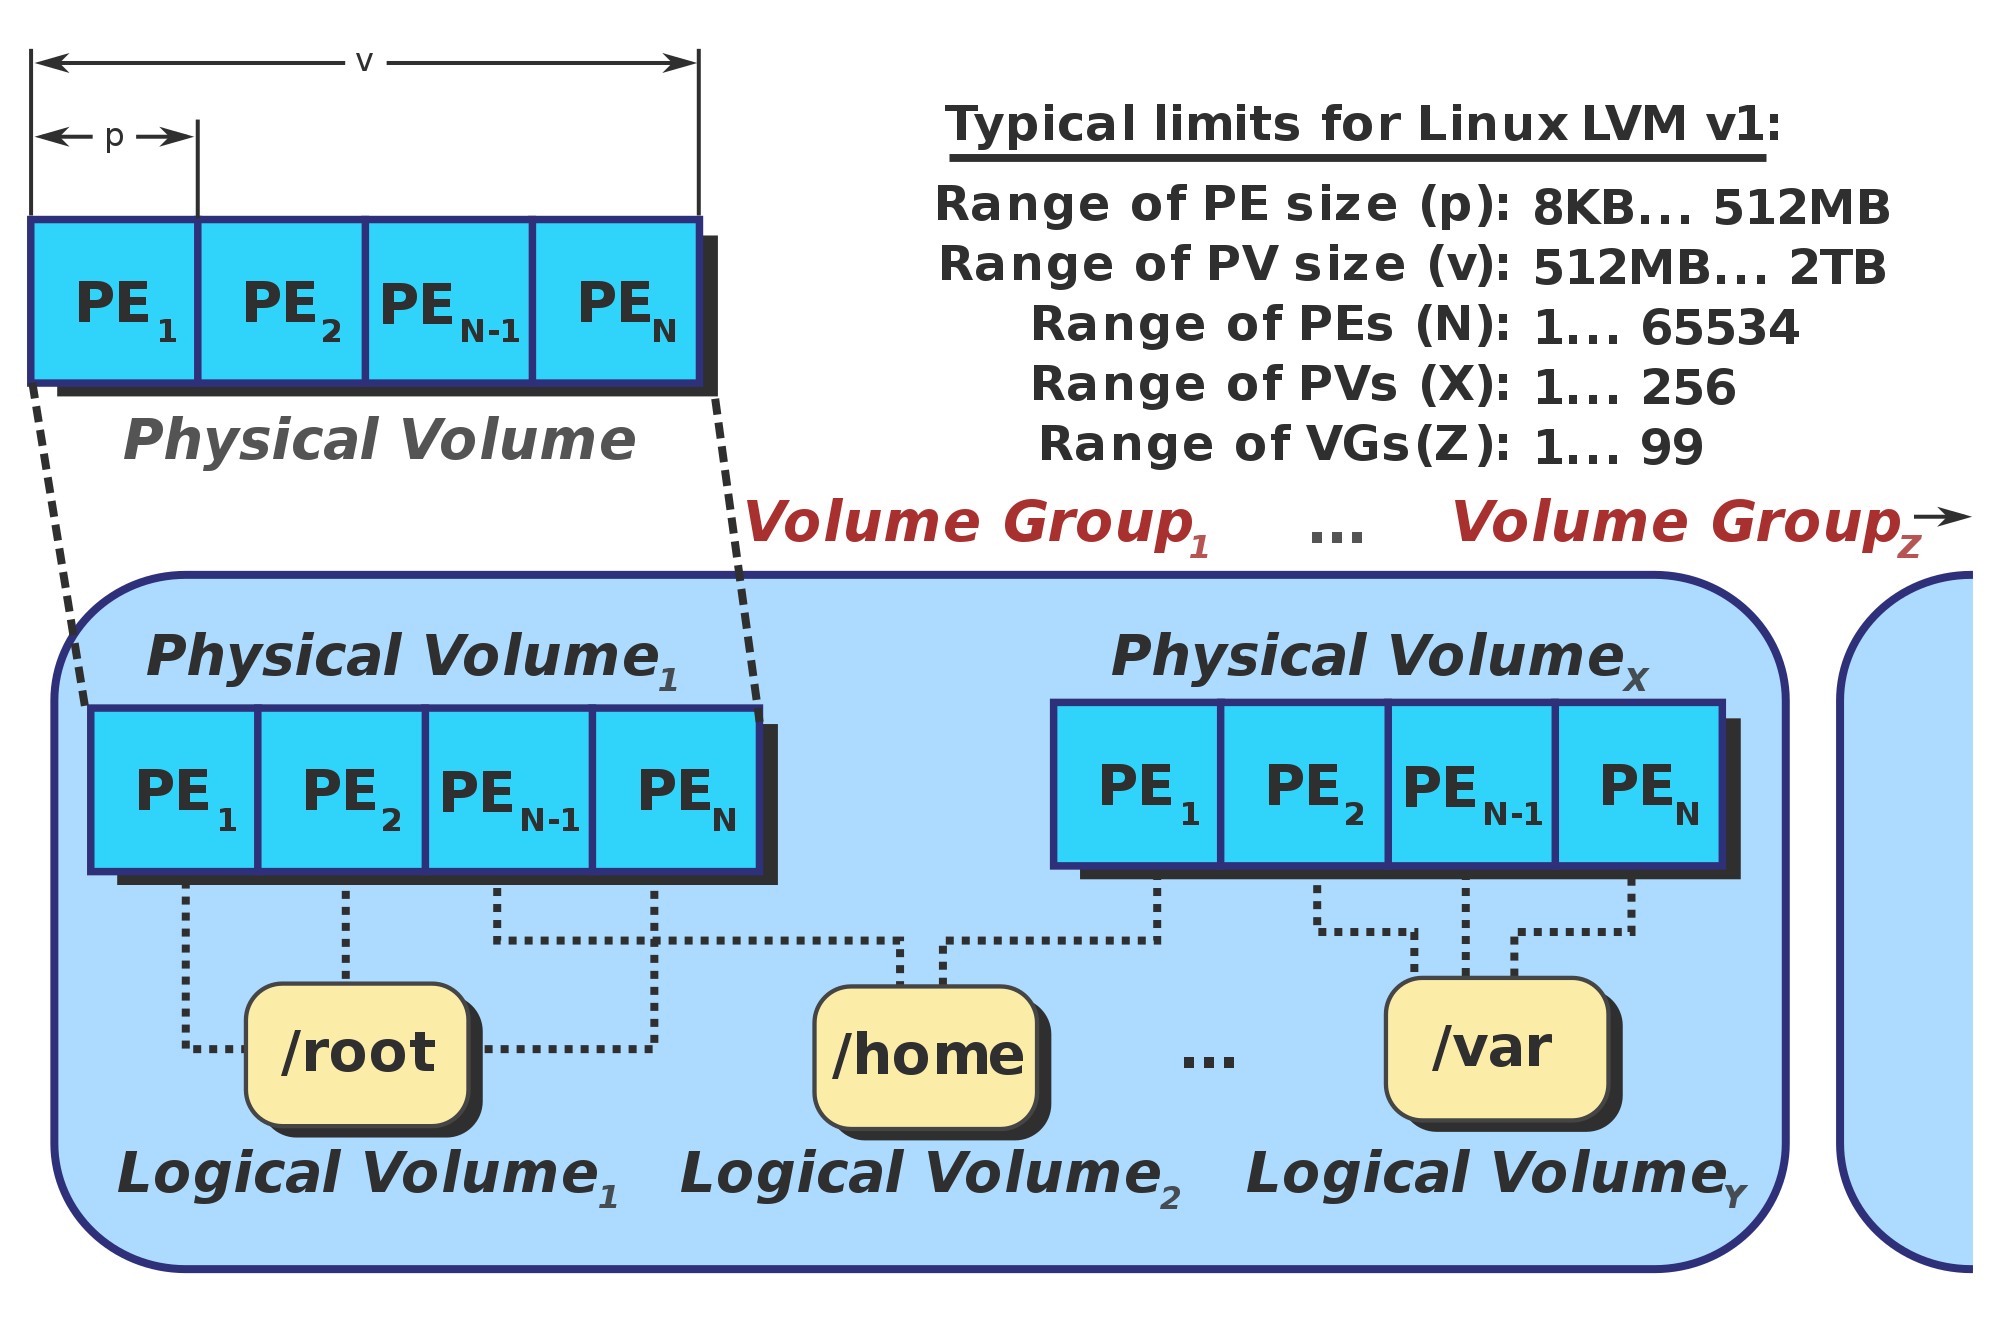
The VMs by default get 10GB of space assigned which gets partitioned in a regular boot partition and a secondary partition used as a Physical Volume.
Additional Logical Volumes get created from the PV for /, swap and /var.
For most applications, this is pretty much barebone, and depending on the usage, disk space gets depleted very quickly.
However this is actually ideal as this gives you the chance to minimize disk usage claimed from the Hypervisor for stuff that matters.
You could easily add an extra LV dedicated to mysql and expand it in case databases run out of space without having to introduce downtime (provided you have free space left in the Volume Group so you don't need to reboot).
Creating a new LV inside the VM
First you may want to check if the VG still has space left to create a new LV by using lvs
lvcreate -L <lv_size> --name <lv_name> <vg_name>
Example: lvcreate -L 10G --name lv_mysql /dev/mapper/vg_name
Don't forget that in order to actually be able to mount and use it, you need to partition it first!
Quick example: mkfs.ext4 /dev/mapper/vg_name_lv_name
Extending the Volume Group of an existing VM
You maybe first want to check if the volume group on the hypervisor has enough space left to assign to VMs with vgs
lvextend -L +10G /dev/vgStorage/myvirtualmachinevg
Usually this isn't enough, the VM will likely not be able to see the changed size. In my experience I need to completely shutdown the machine in order
to have it detect the changed specs of the virtual hard drive, a reboot won't do.
After the VM is powered on again, the size of the 2nd partition needs to be expanded.
Here's a sample of what the partition table might look like:
[root@somehost ~]# fdisk -uc /dev/vda

Command (m for help): p

Disk /dev/vda: 21.5 GB, 21474836480 bytes
16 heads, 63 sectors/track, 41610 cylinders, total 41943040 sectors
Units = sectors of 1 * 512 = 512 bytes
Sector size (logical/physical): 512 bytes / 512 bytes
I/O size (minimum/optimal): 512 bytes / 512 bytes
Disk identifier: 0x00082213

Device Boot      Start         End      Blocks   Id  System
/dev/vda1   *        2048      206847      102400   83  Linux
/dev/vda2          206848    41943039    20868096   8e  Linux LVM
- fdisk -uc /dev/vda
- p (print the current partition layout)
- d 2 (delete the second partition, the LVM one)
- n p 2 (create a new secondary primary partition)
- t 2 8e (set the type of the secondary partition to LVM)
At this point, make sure that the new partition has the identical same beginning sectors, and if all goes well,
the end blocks should be bigger than before the deletion.
- w (write the new partition layout back to disk)
Fdisk in my case warns about the kernel not being able to re-read the changed partition scheme. I just restart the VM at this point as the suggested methods by the tool don't seem to work.
After the reboot, issue:
pvresize /dev/vda2
This will tell LVM that it needs to expand our Physical Volume (on the 2nd partition). After that, you can issue pvs to check that the additional free space was indeed added.
In the next session, I will show you how you can use the additional free space to extend an exisiting Logical Volume inside the VM
Extending the Logical Volume inside a VM
You can easily extend the LV inside a VM with the following command:
lvextend -L +10G /dev/mapper/vg_name_lv_name
If you want to assign all the available disk space to the LV, because that's the kind of person you are, you can use this:
lvextend -l +100%FREE /dev/mapper/vg_name_lv_name
Don't forget that you just increased the physical aspect of the Volume, you need to make the underlying Filesystem aware of the change.
For EXT4, it's as simple as:
resize2fs /dev/mapper/vg_name_lv_name
EXT4 supports online increases, so this operation will not cause downtime.
You can have the filesystem increase with the LV at the same time by using the -r option in lvextend or lvresize.
Extending an LV disk in the the VM
We assume that on the hypervisor level you have a Logical Volume attached to a virtual machine as a disk.
You can extend the LV through the usual command:
lvextend -L +10G /dev/mapper/vg_name_lv_name
Next, you need a way to signal the VM that something changed to the disk is has attached.
First we figure out what the block device name is of the LV we attached to the VM:
virsh qemu-monitor-command <name of the vm> info block --hmp
drive-virtio-disk0: removable=0 io-status=ok file=/dev/<volume group>/<name of vm> ro=0 drv=raw encrypted=0
drive-virtio-disk1: removable=0 io-status=ok file=/dev/<volume group>/<name of vm> ro=0 drv=raw encrypted=0
drive-virtio-disk2: removable=0 io-status=ok file=/dev/<volume group>/<name of vm> ro=0 drv=raw encrypted=0
Next, we signal the VM about our changed disk (in this case, we changed the size to 40G and it's disk2):
virsh qemu-monitor-command <name of vm> block_resize drive-virtio-disk2 40G --hmp
You you look at dmesg inside the VM, you can confirm that the action succeeded by finding the following:
[2857759.858238] virtio_blk virtio3: new size: 83886080 512-byte logical blocks (42.9 GB/40.0 GiB)
[2857759.870167] vdc: detected capacity change from 32212254720 to 42949672960
Depending on whether you are working with a raw data disk or the disk contains a partition you will either need to just resize the filesystem on the disk to fit within its new boundaries, or have to increase the partition first.
Conclusion
LVM is a really powerful tool, you should strongly consider using it wherever you can.
I highly recommend always assigning a bit more disk space to the VG, you don't necessarily need to use it all up immediatly, but it's nice to always have some free space you can immediately assign without downtime.